|
|
|
 |
e-mail: gmarten@netcarrier.com |
| | Home | About Me | Bicycles & H/GPV's | Rants | eBay | |
Get 'Bent... Recumbent that is!
| I believe this enchantment all began when, as an impressionable youth, I saw my first recumbent majestically perched in a bicycle dealers showroom window. I was immediately awestruck! What was this magnificent creation I beheld? It burned an indelible impression on my memory. I had to have one! This goal went unrealized until late summer of 2001. Thanks to the wonder of the internet this memory was recalled by an inadvertent search result. One thing led to another and I would no sooner think of where I wanted to go with the project and the necessary piece or solution to a problem materialized. |
| At this point of the project final assembly has been completed, with some minor details to be addressed, sorted through and worked out. Though, I do feel, like any other creative endeavor that there will always be something more to be done. |
| I've provided pictures for your enjoyment and perhaps a solution or two can be found for you as well. |
Project 'Bent One
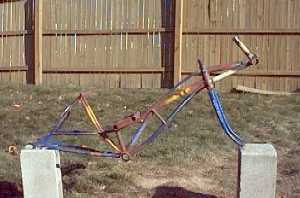 |
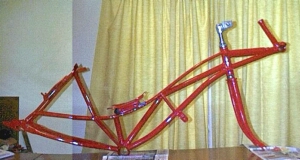
A general overview of the frame. The dark blue is the remnants of the host frame. The seat post has been cut off flush with the top of the upper down tubes. The seat stay tubes have been cut to accommodate my seat angle. Across the cut ends of the seat stay tube is a piece of 1/2" wide flat stock. This is a fastening point for the back of the seat. The small diameter yellow tubes running up from the bottom bracket to the seat back mount provide for triangular strength of the rear section. The forward sectio n has been triangulated in a similar fashion with larger diameter tube. |
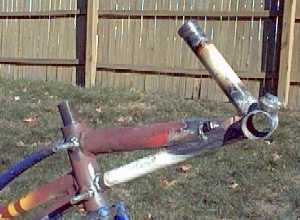 |
A close-up of the boom section. Mounted in front of the steering head, the boom provides for forward mounting of the pedal crank. I've used the bottom bracket from a salvaged donor bike, cut the down tube and seat post to about 8" long and trimmed the chain stays flush with the lugs on the bottom bracket. I used standard automotive freeze plugs to cap off the top of the seat tube and the raw ends of the chain stays. The down t ube is inserted into another tube welded to the steering head. This allowed for a more precise adjustment of the boom length, just telescope the tubes until proper length is achieved and weld it in place. An additional tube was welded from low on the steeri ng head to the bottom bracket to provide extra strength. Two 3/8" bolts have been welded to the right side of the steering head. These are to mount chain idler idler wheels. |
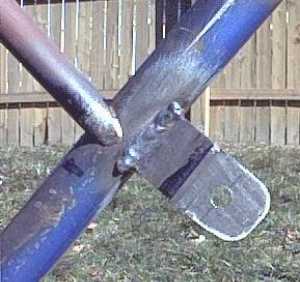 |
This simple bracket, mounted about half way down the down tube is a mount for a modified rear deraileur. This will manage chain tension to allow shifting of the relocated chain rings. |
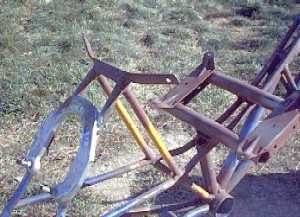 |
Here you see the seat mounts. I've used a "Brunswick" fiberglass school chair. I removed the seat from the base, cut the legs off of the base and welded the base to the upper tubes. After locating the bottom of the seat, it was a matter of determining where to cut the seat stay tubes and tack on a flat stock bracket to stabilize the back of the seat. Also shown is a brake yoke from a MTB front fork. Another trash salvage. The forks were broken off right at the bottom of the steer tube... OUCH! |
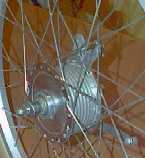 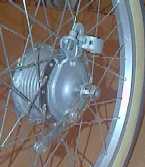 |
Here's something you don't see every day, an Arai Mini Drum Brake front hub. If you look closely you'll see that the actuating arm has been lengthened about 1", this with the Pro-Max Levers I'm using give excellent lever feel and stopping power too! |
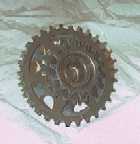 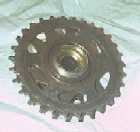 |
Another interesting item, a rear freewheel cluster modified to spin in either direction. I'll be using this as a chain jack-shaft under the seat. There are four cogs on this cluster; the two large gears are both 28 tooth with two spacers in between them. This will give me a 1:1 pass thru ratio. I'll use this as my starting point. Then there are two smaller sprockets. one 17 tooth and the 14 tooth on the end to hold it all together. Depending on how I run the chain I'll can have under or over drive out of this. This whole unit will screw into a standard three piece bottom bracket. Click here for more detailed information on this |
 |
It's been some time
since my last update... looking at the date of the above
images I'd have to say since November of 2001. Well, here
it is March of 2002 and this picture of the frame was
taken the day I got it back form the painter... 12/17/01.
A decided "Ducati-esque" look I must say! |
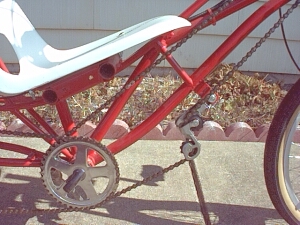 |
Well, my nifty idea for using a freewheel cluster for the jackshaft went down the drain. As they say "The road to hell..." There were just too many costs and aggrivations to contend with in converting the Ashtabula bottom bracket housing to accept a 3 piece unit, so I took a one piece crank, chucked it in the vise and had to with a hack saw, removing all the metal that I didn't need. What I ended up with was a "J" shaped piece of metal. Using two chainwheels with a stack of spacers in between to allow for clearance between the chains, necessatated a bit of welding to be done to lengthen the chainwheel locator pin. Scrounging through my parts boxes I was able to find two five spoke chainwheels of the same tooth count, providing a 1:1 pass through ratio. This however is subject to change as more shake-down riding is done. |
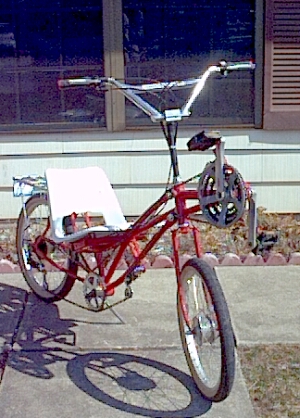 |
This 3/4 front shot
provides a good over-all look at the design of this 'bent. Mounted to studs welded on the steering head are plastic idlers from a rear derailer. The inital shake down ride reports that this idea, while good in concept was a failure in practice. There is too much lateral movement in the chain when shifting up front and this idler design can't keep up with the movement due to stiction on the stud and not enough "trapping" of the chain. My plans for the revision include a slotted rollerskate wheel with chamfered edges riding on a well lubricated sintered bronze bushing over the studs. Also noted on the shake down ride was the fact that there's not enough pull on the derailer mounted amidship to allow shifting of all three chainwheels up front. This I'll have to change to a longer armed derailer, something from a mountian bike that carries a triple chainwheel perhaps. |
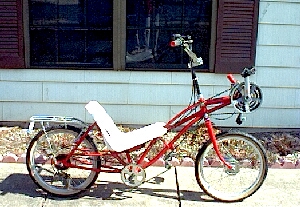 |
This full right shot
shows the seat/bars/pedals relationship. While the bars
are quite high, higher than on the original bike. The
riding position is very comfortable. Yes, the pedals are high. An very agressive position so I've been told by other 'bent riders. It uses muscle groups never dreamed of when riding a "wedgie". Starting off requires new skills too. With the pedals in the postion shown, you push off hard while maintaining ballance with your left foot. Once under way, quickly bring the left foot up to the pedal and start cranking. This does take some getting used to, but once mastered it is simple |
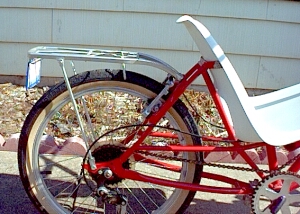 |
This close-up of the hind quarters provides a good look at the Pleschler rack I scrounged up for the bike. Mounting was exceptionally straight forward. The top plate that everyone swears at for scuffing and crushing seat stay tubes was thru bolted directly to the top of the "V-Brake" yoke. The rear supports were too long for this application so out came the trusty hacksaw to shorten them to the proper length and then using a neato little aluminium block from the electrical supply house called a "#2 lug" this fit on the rod perfectly and with a sweet little shoulder that rests on the rear dropout, all I had to do was drill a hole in the dropout and bolt it fast. Viola, the rack is as strong and sturdy if not more so than the day it was made! |
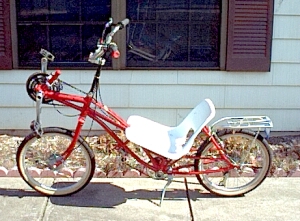 |
With all the previous
shots being of the right side, the left side has
pettioned me for representation too. So, to appease the
left side of the bike... here it is. Seriously. it gives a better view of the front derailer mounted on the boom and an idea of the little stubby kickstand. |
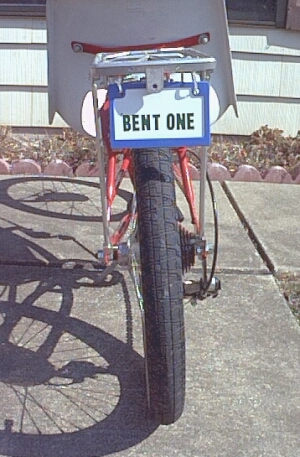 |
This just about says
it. A bit of a double entandre, is this the first of a
line of many, or a statement about it's creator, or is it
both? Yes to both! 8-) But the next generation will have to wait until the modifications are finished and while other projects come to fruition. Also, pending for this is a donzer little storage trunk made from an opaque black locking 5 1/4" floppy drive storage box that will mount on the rack. This is a necessity as there is no place to carry anything on this bike... not even keys! |
| In closing this segment I'd like to take the
time to thank all the people who have been instrumental
in this project coming together... especially my partner
Evva, without who's help in holding things while I cut
them and whacked them into place, her brilliant ideas
when my brain had dried up and blown away, and not
forgetting her constant words of support and
encouragement when all that could go wrong, did. Love ya
sweetheart. Also, a special thanks to Roger at Sigman's Auto Body in Milford Square, PA. A true artist with flame and paint, and an all-round hell of a good guy! Thanks Roger! Let me not forget Cliff at Cycledrome in Quakertown, PA. For his patience with me as I dominated hours of his time poking around in his brain, his catalogs and his parts bins. Oh, yeah and for the time he spent getting the chain "just right". Cheers mate! |
|
| Home | About Me | Bicycles & H/GPV's | Rants | eBay |